Installation Guide
Crown molding is made from high density furniture grade polyurethane and can be worked like wood. Our Molding for Indirect Lighting and Modern Moldings are exquisitely detailed from handcrafted molds ensuring a quality product every time. All crown molding is pre-primed and can be finished with either latex or oil base paint
TOOLS AND MATERIALS FOR CROWN MOLDING INSTALLATION
Tools and Material
- Sponge or clean cloth
- Caulking gun
- Miter box and saw or power miter saw
- Chalk line box and pencil or auto-level laser tool
- Polyurethane construction adhesive (PL Premium, Loctite Power Grab, etc..)
- Non-shrink filler or spackling paste
Optional Tools and Material
- Putty knife
- Hammer and nail set or air-gun nailer
- Elastomeric adhesive caulk
- Extra fine sandpaper
- 6d or 8d finishing nails (bright finish or electro-galvanized) fasteners must penetrate substrate a min. of 1/2′ to 3/4′
PLANNING YOUR SPACE FOR CROWN MOLDING INSTALLATION
When installing a crown molding it is important to establish a plan for the layout
Start by measuring your room to determine linear footage of crown molding needed. Add 10% of total length for miter waste
Safety Tip: to avoid using a ladder to determine Linear Footage requirements measurements can be done by measuring the various lengths from the floor or directly from a floor plan
Divide total linear feet by crown molding lengths. For example: the molding comes in 7’10.5” – foot lengths, divide total linear feet by 7.785 and 10% more to cover corners and wastage then round up the number of lengths needed to determine total number of crown molding lengths you will need to purchase
ALWAYS store molding in a dry well-ventilated, low humidity area. NEVER store molding outdoors
BEFORE CROWN MOLDING INSTALLATION
You can finish [paint or faux finish] crown molding before or after installation
After installation touch-up areas as needed
Place crown molding in room for at least 24 hours before installation to allow molding to adjust to room temperature and humidity levels of the room
SURFACE PREPARATION FOR CROWN MOLDING INSTALLATION
Clean all surfaces free of dirt and loose particles with a clean cloth or sponge
Make sure area is completely dry before installing crown molding

Mitering Crown Molding Corners
The key to successful mitered corners is placing the crown molding correctly in the miter box or power saw fence/rail
Crown molding should be placed in the box so that the ceiling bedding edge of the molding lies against the bottom of the box or saw and the wall bedding edge of crown molding lies against the side of the miter box opposite you. TIP: Before cutting, label the miter box or saw bottom “ceiling” and the side with “wall” (A)
Cut all miters and butt joints before you install crown molding. After cutting, lay crown molding in place around the room to make sure all cuts and joints are correctly measured
Mitering Inside Crown Molding Corners
Take two pieces of crown molding that will be used for your inside corner
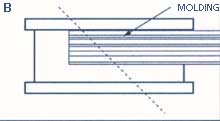
Place the “left” length of crown molding in the box as described above and cut 45° mitered corner – your saw should point left (B)
Next place the “right” length of crown molding in box – before cutting note molding pattern and adjust your cut to allow for continuity of pattern. Cut the right miter with your saw pointing right (C)
Check your cuts by placing the two mitered ends together, to ensure a good fit
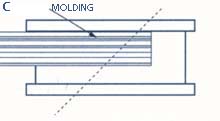
Cut the right miter with your saw pointing right (C).
Check your cuts by placing the two mitered ends together, to ensure a good fit.
Mitering Outside Crown Molding Corners
Take two pieces of crown molding that will be used for your first outside corner
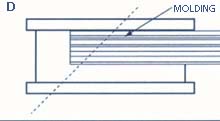
Place the “left” length of crown molding the box as described above and cut 45° mitered corner – your saw should point right (D)
Next place the “right” length of crown molding in box – before cutting note crown molding pattern and adjust your cut to allow for continuity of pattern. Cut the right miter with your saw pointing left (E)
Check your cuts by placing the two mitered ends together, to ensure a good fit
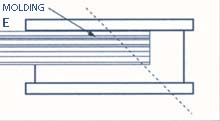
Next place the “right” length of crown molding in box – before cutting note crown molding pattern and adjust your cut to allow for continuity of pattern. Cut the right miter with your saw pointing left (E).
Check your cuts by placing the two mitered ends together, to ensure a good fit.
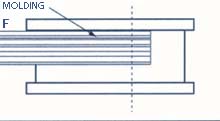
Crown Molding Butt Joints
When crown molding lengths do not span the entire length of a room, you will need to “butt joint” two crown molding lengths together.
Lay the crown molding in the miter box the same as described above and cut a straight edge (F).

General Crown Molding Installation
First mark the entire length of wall around the room with your chalk line box and pencil. Or use an auto-level laser tool. You will mark the bottom edge of the crown molding.
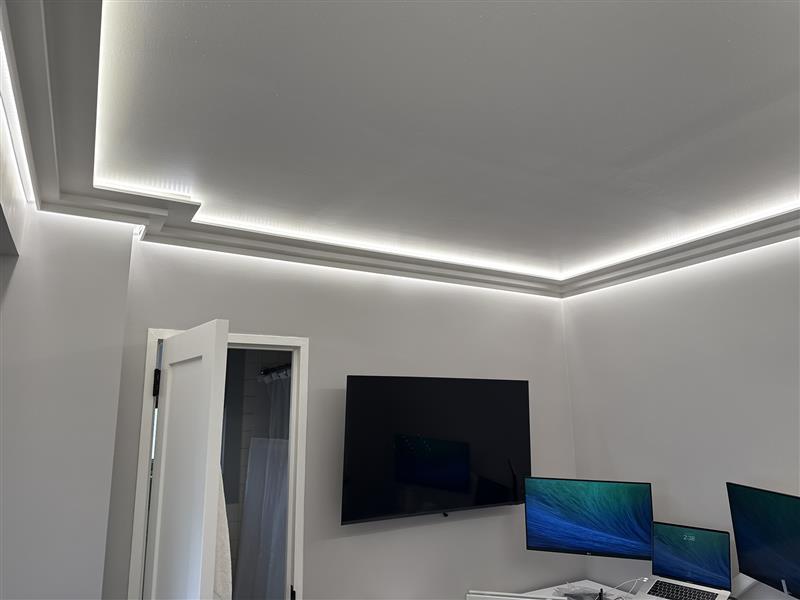
Note: For Crown Molding for Indirect lighting the closer you place then to the ceiling the more “beam” effect you get. The further down the wall you install the moldings the more light will escape for more of a “glow” effect. We generally recommend to initially come down from the ceiling the actual height of the molding – this will give a balanced look.
Apply a ¼” continuous bead of construction adhesive along the backside and/or bottom edge of crown molding [G] and at butt joint ends.
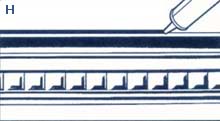
Note: Generally; for molding for Indirect Lighting only one side uses adhesive to secure to the wall or ceiling.
Use adhesive of filler to fill any gaps. Gently press the crown molding edge and smooth excess chalk with your finger or putty knife, giving the appearance of the crown molding being part of the wall [H]. Wipe any excess adhesive from edges and clean with mineral spirits
Option: You may want to tack or secure crown molding into place with an air-nailer or with finishing nails. If you want to remove nails after construction adhesive dries, leave approximately ½’ nail exposed for easy removal.
PRO TIP: When adhesive dries [approx. 2 -3 hours] either remove the finishing nails or use nail set to countersink nails, making sure that nails penetrate wall at least ½” to ¾”
Fill nail holes with non-shrink filler or elastomeric adhesive/caulk – smooth the surface with your finger or putty knife. Once the filler / caulk is dry and if needed, lightly sand crown molding rough spots with extra fine sandpaper
PRO TIP: If the joint adhesive shrinks you can use non-shrink filler or Drywall Spackle to fill any gaps. When dry sand smooth to hide the joint seams.
Paint or touch up crown molding with paint as needed
While Installing Crown Molding Always Follow These Safety Suggestions
Follow good construction practices.
When using power tools, adhesive and finishing materials [such as paint or stain], be sure to follow manufacturer’s instructions
Always wear safety goggles when using a power tool or hammer
Always use the right tool and/or equipment for the job
General Precautions:
Crown moulding function as a decorative element only and are not designed to support electrical fixtures or provide any load bearing capacity. InvitingHome.com shall not be responsible if any failure to comply with these crown molding installation instructions results in the product failing to perform the purpose intended