Frequently Asked Questions
Find helpful answers about DuraKwik Molding products, including installation guidance, design tips, material info, and ordering support. Whether you’re planning a project or troubleshooting on site, this FAQ has you covered.
The molding is made from a furniture grade polyurethane. Polyurethane is a great choice for Crown Molding, Trim and Baseboards since it does not absorb moisture which causes a typical wood molding to shrink or swell. Other advantages of polyurethane moldings is that they are strong as wood, hypo-allergenic, formaldehyde free, and the bugs won’t eat it. Our polyurethane has the same density as wood but is lightweight and strong. Molding is very durable and is rated for interior and exterior installation.
To determine how much molding needed measure the length of all the walls where the molding for indirect lighting will be installed to determine the Total Linear Footage required. Once you know the total length and which molding you have selected you divide the Total Linear Footage required by the Length of each stick of molding. Please add 10% extra to account for corners and wastage.
SAFETY TIP: To avoid using a ladder to determine Linear Footage requirements for your Crown Molding, measurements can be done by measuring the various lengths from the floor or directly from a floor plan.
Yes – no special tools are required; you use the same tools as you would with wood to cut and install.
Installing DuraKwik Molding is easier than wood molding. The moldings come primed ready for painting. No special tools required, you use the same tools as you would with wood to install. Molding is installed with construction adhesive and a few small nails/brads [many professionals use an air-nailer with small brads] to hold the molding in place as the adhesive dries.
Use construction adhesive to butt joint x2 molding sticks together. Let dry then fill seam with non-shrink filler or sandable spackle then use caulking tool wipe it in and let dry. When dry – sand smooth with sandable sponge.
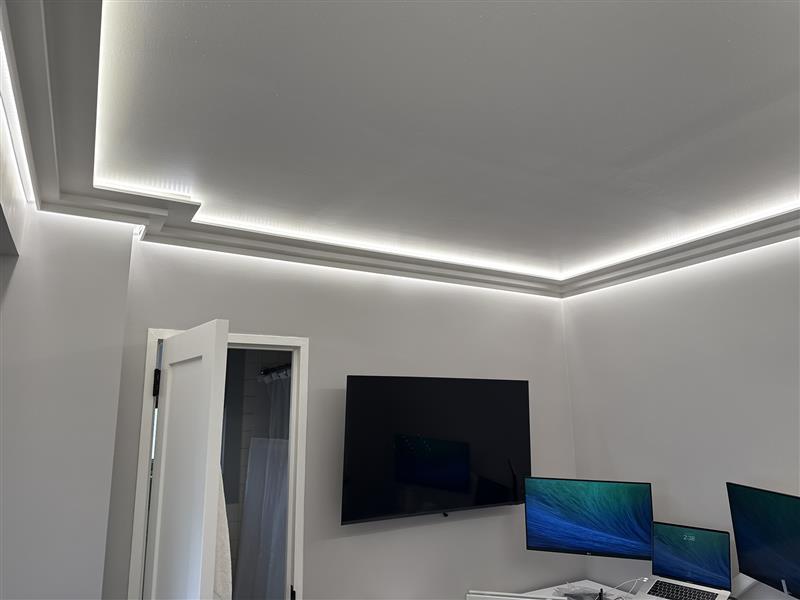
Regarding Moldings for Indirect Lighting in general the closer you place them to the ceiling the more of a “beam” effect you get. The further down the wall you install the molding the more light that can escape for more of a “glow” effect. We generally recommend to initially come down from the ceiling the actual height of the molding – this will give a balanced look.
Molding for indirect lighting is specifically designed such that only x1 side of the molding needs to be attached.
For Molding for Indirect lighting, the LEDs can either be placed in the trough or in most cases attached to the wall behind the molding
Crown Molding Terms for Dimensions:
H = Height – how far the molding goes down the wall
P = Projection – how far the molding sticks-out [i.e. Projects] onto the ceiling
F – Facia – measurement of the face of the molding [hypotenuse of a triangle]
L = Length – the length of a stick of molding
Most of the moldings have a little picture just to the left of the molding stick that shows the Side Profile of the molding when attached to a wall. For simple crown moldings the H and P can be reversed see above.
The molding is made from a furniture grade polyurethane. Polyurethane is a great choice for Crown Molding, Trim and Baseboards since it does not absorb moisture which causes a typical wood molding to shrink or swell. Other advantages of polyurethane moldings is that they are strong as wood, hypo-allergenic, formaldehyde free, and the bugs won’t eat it. Our polyurethane has the same density as wood but is lightweight and strong. Molding is very durable and is rated for interior and exterior installation.
The molding is made from a furniture grade polyurethane. Polyurethane is a great choice for Crown Molding, Trim and Baseboards since it does not absorb moisture which causes a typical wood molding to shrink or swell. Our polyurethane has the same density as wood but is lightweight and strong. Molding is very durable and is rated for interior and exterior installation.
The molding come primed ready to paint. You can use oil or water-based paints. Generally, for crown moldings a semigloss coat is recommended.
There may be some confusion between Square footage [SF] and Linear Footage [LF]
For example, if you have a room that is 25 feet x 20 feet
Square Footage = [25 x 20] = 500 Square Feet
Linear Footage [25 +20 + 25 +20 = 90 Linear feet] this is the perimeter of the room
Crown molding or baseboard is installed around the perimeter of a room so you will need 90 LF of molding which is approximately 12 sticks of molding
Note: each stick of molding is 7.875 linear feet, therefore 90/7.875 = 11.4 sticks so rounding up x12 sticks of molding]
To determine how much molding needed measure the length of all the walls where the molding will be installed to determine the Total Linear Footage required. Once you know the total length divide the Total Linear Footage required by the Length of each stick of molding [each stick of molding is 7.875 feet long].
For example, if you have a room that is 25 feet x 20 feet
Linear Footage [25 +20 + 25 +20 = 90 Linear feet] this is the perimeter of the room
Moldings are installed around the perimeter of a room so you will need 90 LF of molding which is approximately 12 sticks of molding.
Note: each stick of molding is 7.875 linear feet, therefore 90/7.875 = 11.4 sticks so rounding up x12 sticks of molding]
For crown molding add 10% extra to account for corners and wastage.
For chair rail and casings add 5% extra to account for corners and wastage.